Best Chicken Predator Protection: 7 Picks and Who Needs Them
A run with 40 feet of intact mesh can still fail at a 4-inch gap beneath the gate. That is why the best chicken predator protection is a route-by-route system, not a single product. The seven picks below cover digging, climbing, flying, dusk access, open-ground pressure, and the uncertainty of not knowing what visits.
Start with the barrier that closes the route you actually have. A hawk problem needs a roof. A fox working at the soil line needs an apron. A raccoon testing a door needs a latch with a second deliberate action. Scare devices may help you watch a problem, but they don't replace a barrier.
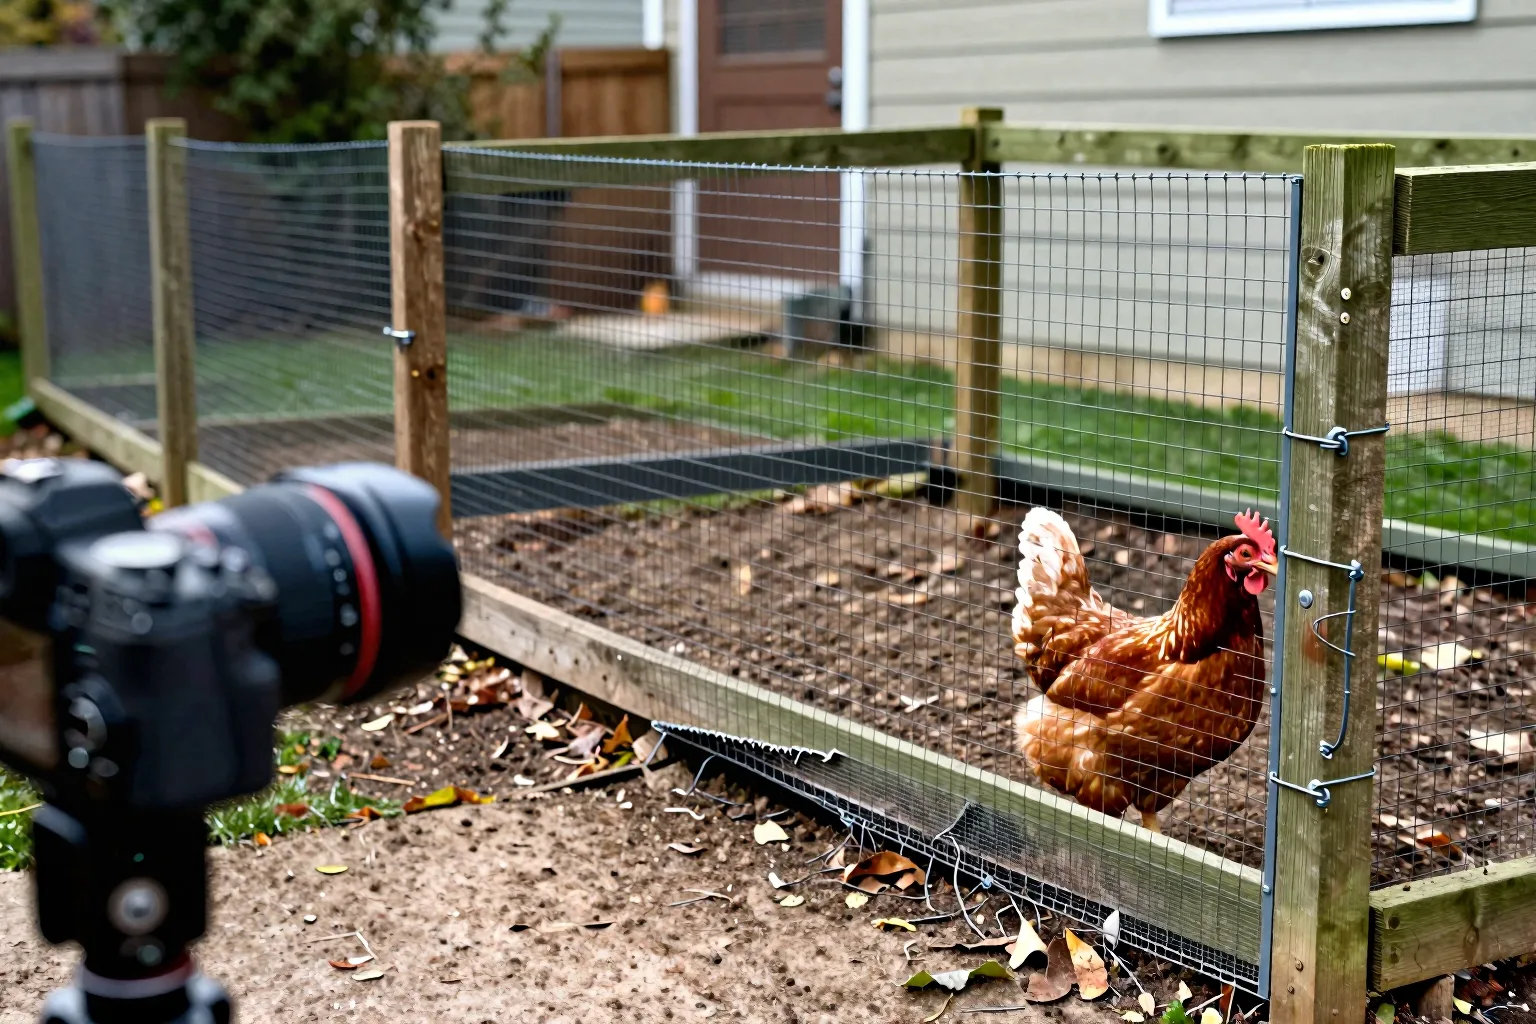
Start with the route: identify what is reaching your flock
Before you buy anything, walk the perimeter in daylight. Look for disturbed soil at the run wall, a bent lower panel, loose fasteners, missing feed, scratches around the door, or feathers outside the fence. Then check the same area at dusk. A camera is useful here because the visit time often tells you which pick deserves your money first.
Use four questions:
- Which predators are plausible in your yard? Think about foxes, raccoons, loose dogs, opossums, snakes, hawks, owls, and local climbing animals.
- Can the visitor dig, climb, squeeze through mesh, or arrive from above?
- Does the problem happen after dark, during daylight ranging, or at both times?
- Are your birds inside a run, or are they crossing open ground?
| Clue or route | Start with | What it still leaves open |
|---|---|---|
| Soil pushed away from the run wall | Pick 2, the anti-dig apron | A gate gap, a climber, or an aerial attack |
| Bent mesh, loose staples, or a reachable seam | Pick 1, 1/2-inch welded hardware cloth | A weak frame, roof gap, or unsecured door |
| Birds outside during daylight with hawks nearby | Pick 3, a complete run roof | Digging underneath and night-time access |
| Scratches or feed loss after dark | Pick 4, then Pick 5 if closure is easy to miss | Any opening in the run walls or roof |
| Birds ranging beside fields or woods | Pick 6, electric poultry netting | A hawk above or a predator already inside |
| No clear sign at all | Pick 7, a camera or motion light | Every physical route into the enclosure |
A 3-4 hen suburban flock usually has a different priority from a 6-12 hen flock beside woods. With fewer birds and a compact run, you can make every seam and corner easy to inspect. With more birds, the run is often larger, so there are more joints, gates, and low spots to maintain. If you are still sizing the enclosure, compare your plan with Chicken coop size: square feet per bird inside and in the run before buying protection. A barrier that leaves your birds crowded creates another management problem.
My ranking starts with physical exclusion because it works while you are asleep, busy, or away from the yard. Add monitoring when you need information. Add a deterrent when it fits the route. Don't reverse that order.
Pick 1 — 1/2-inch welded hardware cloth for the coop and run
Best for: nearly every backyard flock that needs a durable base barrier.
Use 1/2-inch welded galvanized hardware cloth on the run walls, coop vents, lower door sections, and awkward gaps under eaves. It is the foundation pick because a close, stiff grid gives a probing animal less room to push through or reach around than a flexible, wide-opening sheet.
I treat ordinary chicken wire as a containment material, not the outside predator barrier. It can keep your hens from wandering and can separate birds from a garden bed. Its flexible construction is less suitable for an exposed run where an animal may push, pull, chew, or work at an edge. A good rule for your build is simple: if the mesh moves several inches when you press it, the frame or attachment needs attention before you spend more on accessories.
Attach the cloth to sound framing with screws and large washers, or with another heavy-duty fastening method that cannot pull through the mesh. Keep fasteners close enough together that the lower edge does not bow away from the frame. Overlap seams rather than butting two cut edges together. Fold or cap sharp cut ends. Then inspect the inside as well as the outside. A sharp wire pointing into the run can injure a bird even if it keeps a predator out.
The mesh is only as strong as the structure holding it. A wobbly post, a soft timber corner, or a gate that twists under its own weight can turn good cloth into a decorative curtain. For the full construction sequence, see How to build a predator-proof chicken run with hardware cloth.
Use 1/4-inch mesh selectively. It can make sense around a chick brooder, a small ventilation opening, or a spot with persistent rodent pressure. Covering a whole adult run with a finer grid adds material and can reduce airflow if the design is not adjusted. For most adult hens, 1/2-inch welded cloth is the more practical balance.
For a planning worksheet, put roughly $1.50-$4 per linear foot against the mesh line item. The spread comes from roll width, wire gauge, coating, and whether you buy a shorter roll or a larger 25- or 50-foot roll. That is a budgeting range, not a price claim from this site. Check current local prices, and include washers, screws, corner protection, and waste from cuts.
Pick 2 — an anti-dig apron at ground level
Best for: a run beside soil where a fox, dog, or other ground visitor can work at the wall.
The apron changes where a digging animal meets resistance. Instead of allowing it to start directly below the vertical wall, you lay mesh flat on the ground and make the animal dig into the barrier. Use a 12-24-inch outward-facing strip of hardware cloth. Pin it tightly to the soil, then cover it with a thin layer of dirt, gravel, or mulch so the edge cannot lift easily.
Keep the apron continuous. Follow the run wall around corners. Bring it across low spots. Pay special attention to the gate because the gate often swings above a patch of bare soil instead of sitting over a protected edge. The seam between the coop and run deserves the same treatment. A predator does not care whether a weak point came from the original plan or a later extension.
Where a surface apron cannot lie flat, bury mesh roughly 12-18 inches down. A buried edge takes more digging and usually more preparation, but it is less exposed to mowers, wheelbarrows, and frost heave. A concrete curb is more permanent again. It can simplify mowing and cleaning, but it costs more to install and makes future changes harder.
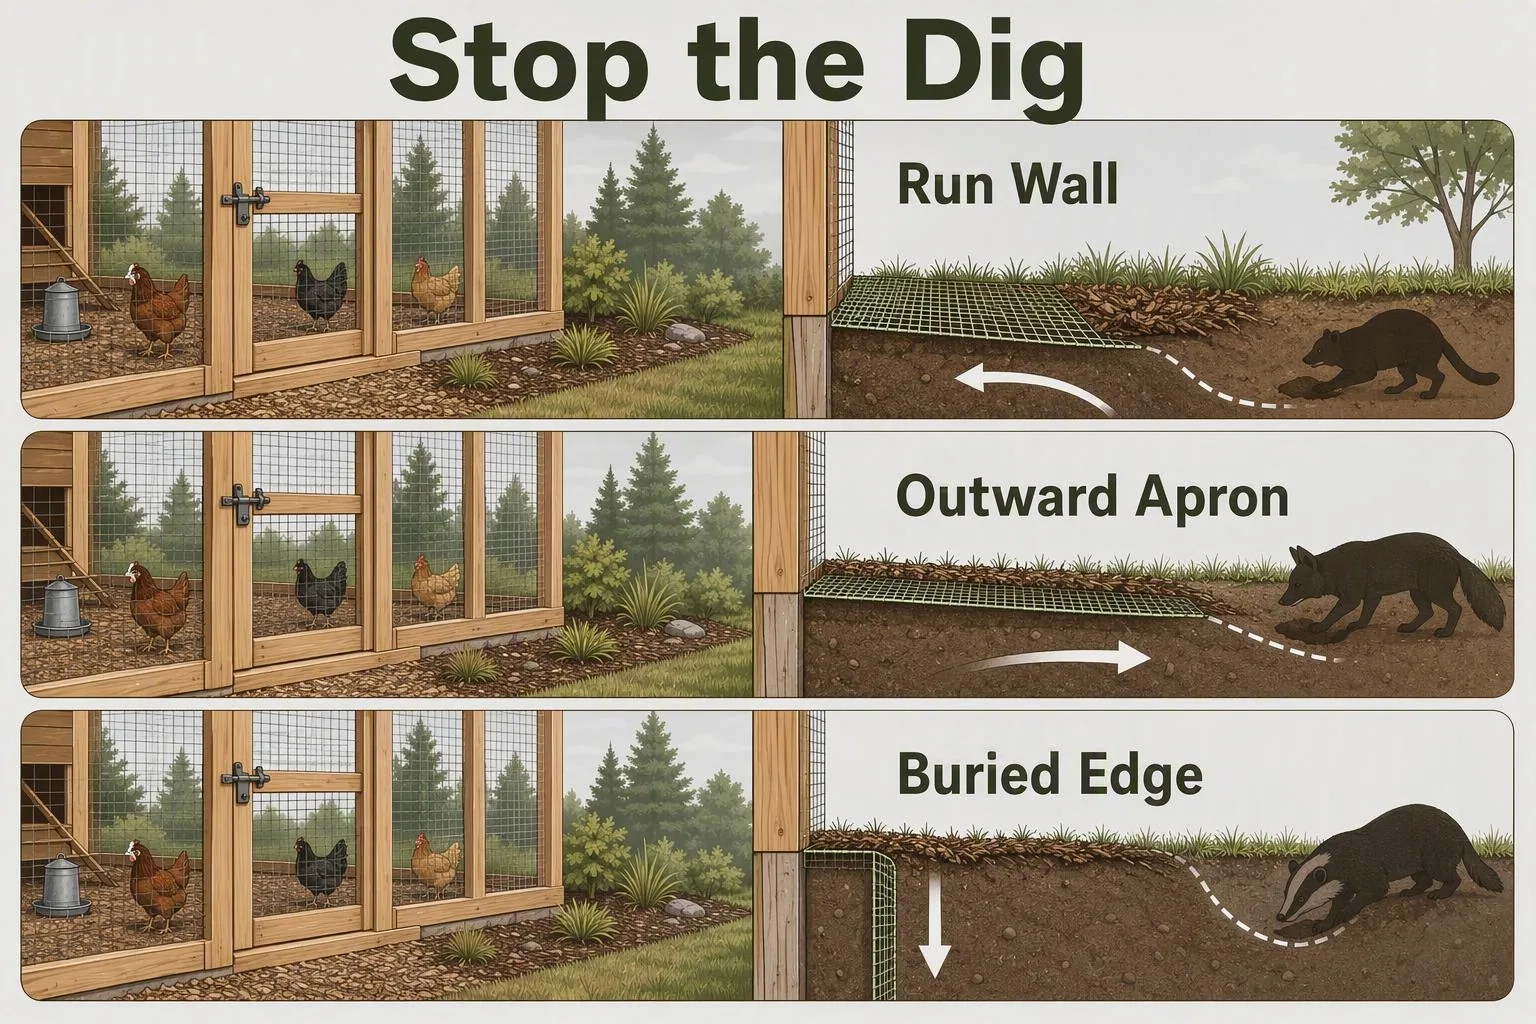
Material and pins may run about $1-$3 per linear foot before labor. Price the complete perimeter, not just the front wall. Current local prices, soil conditions, and whether you already own pins will move the total. If the ground is rocky, the buried option may require tools or base preparation that matter more than the mesh price.
The practical test is not whether the apron looks neat. Put on a work glove and press along the outside edge. If you can lift the mesh enough to slide your fingers under it, close that opening with more pins, soil, or a design change.
Pick 3 — close the attack from above with a run roof
Best for: birds that spend daylight hours outside in an area where hawks or eagles are seen.
A complete run roof is the direct physical answer to an aerial route. It protects the birds without asking you to judge whether a scare device is still working. The word complete matters. Cover the gate line, corners, narrow strips beside the coop, and the section where the run meets the roof. A roof panel that stops short of the wall leaves a landing and entry edge.
Rigid welded wire is the stronger choice where a raccoon may climb onto the run, or where snow load is a serious design issue. Use a product and frame rated for the load you expect. Heavy-duty overhead netting can be lighter and less expensive in a given build, but it needs proper tension, supported edges, and inspection after wind. Netting that sags onto the birds is not doing the same job as a supported roof.
Reflective tape, owl decoys, and moving scare devices belong in the secondary layer. They may change how a visitor approaches for a while, but they do not make a roof. There is no physical mechanism by which a stationary decoy or an ultrasonic device closes a gap, seam, or roof edge. Predators may also become accustomed to a repeated device, so treat any deterrent response as something to observe rather than assume.
For overhead material, a broad planning envelope is roughly $1-$5 per square foot, before framing, fasteners, and support posts. Rigid products tend to sit toward one end of that range and netting toward the other, but local stock varies. Check current local prices, snow conditions, wind exposure, and the manufacturer's load information before choosing the cheaper option.
If hawks are the main reason you are hesitating about daytime ranging, read Should you free-range chickens when hawks are nearby? The decision depends on cover, supervision, and the shape of your yard, not just the presence of one bird overhead.
Picks 4 and 5 — a raccoon-resistant latch and an automatic coop door
Pick 4: use two actions at the human access point
Best for: a coop door or run gate that a raccoon is testing after dark.
A simple hook-and-eye latch asks for one lifting or twisting movement. Replace it with a closure that takes two deliberate actions, such as a spring-loaded snap with a locking carabiner, or a hasp that cannot open until its retaining piece is moved. The goal is not a magical raccoon-proof label. The goal is to make the opening sequence less accessible to a paw working from outside.
Mount the latch where a paw cannot reach around the frame. A strong latch placed beside a wide gap is still a weak door. Check the hinge side too. A door can be secure at the latch and still lift, bow, or slide at the opposite edge. For a run gate, add a stop that keeps the gate flush with the frame before the latch is engaged.
Set aside about $5-$35 for latch hardware. That range depends on whether you need one small coop closure or several outdoor-rated pieces for a gate and pop door. Confirm the actual total at local hardware stores, farm suppliers, or your current online retailer, including the carabiner and replacement fasteners.
Pick 5: let an automatic door handle the dusk routine
Best for: a keeper whose schedule makes night closure easy to miss.
An automatic door reduces one human timing error. It does not make the coop secure by itself. Choose between a light sensor and a timer with care. A sensor follows changing daylight, but shade, clouds, and a sheltered mounting position can affect when it triggers. A timer is predictable, but you need to reset it as the season changes. Either way, set closure late enough for the slowest hen to reach the roost, then verify the timing in person.
Look for a manual override, accessible battery compartment, a door that resists mud and ice, and a mounting position that keeps the track aligned. A vertical drop door needs enough clearance to close fully. A hinged door needs a stop so wind cannot push it back open. Keep litter, straw, and frozen clumps out of the travel path.
An automatic door can jam. It can also close while a hen is still outside if the setting, sensor, or bird behavior is wrong. Test it during installation, after a battery change, and during difficult weather. A daily visual check is still sensible when the forecast calls for ice, heavy snow, or a hard freeze. If you choose this route, pair it with Automatic chicken coop door: setup, winter failures, and weekly testing.
Feature level and weather resistance put a reasonable planning range around $70-$250 for the door unit. Add batteries, a replacement part allowance, or a subscription only if your chosen model requires them. Check current local prices because a low sticker price can omit the mounting hardware or power option you need.
Choose Pick 4 for direct raccoon pressure. Choose Pick 5 when your routine is the weak point. If both conditions apply, use both. Neither one compensates for a hole in the mesh.
Pick 6 — electric poultry netting for an exposed yard
Best for: birds ranging over open ground where foxes, loose dogs, or similar ground visitors approach from outside the perimeter.
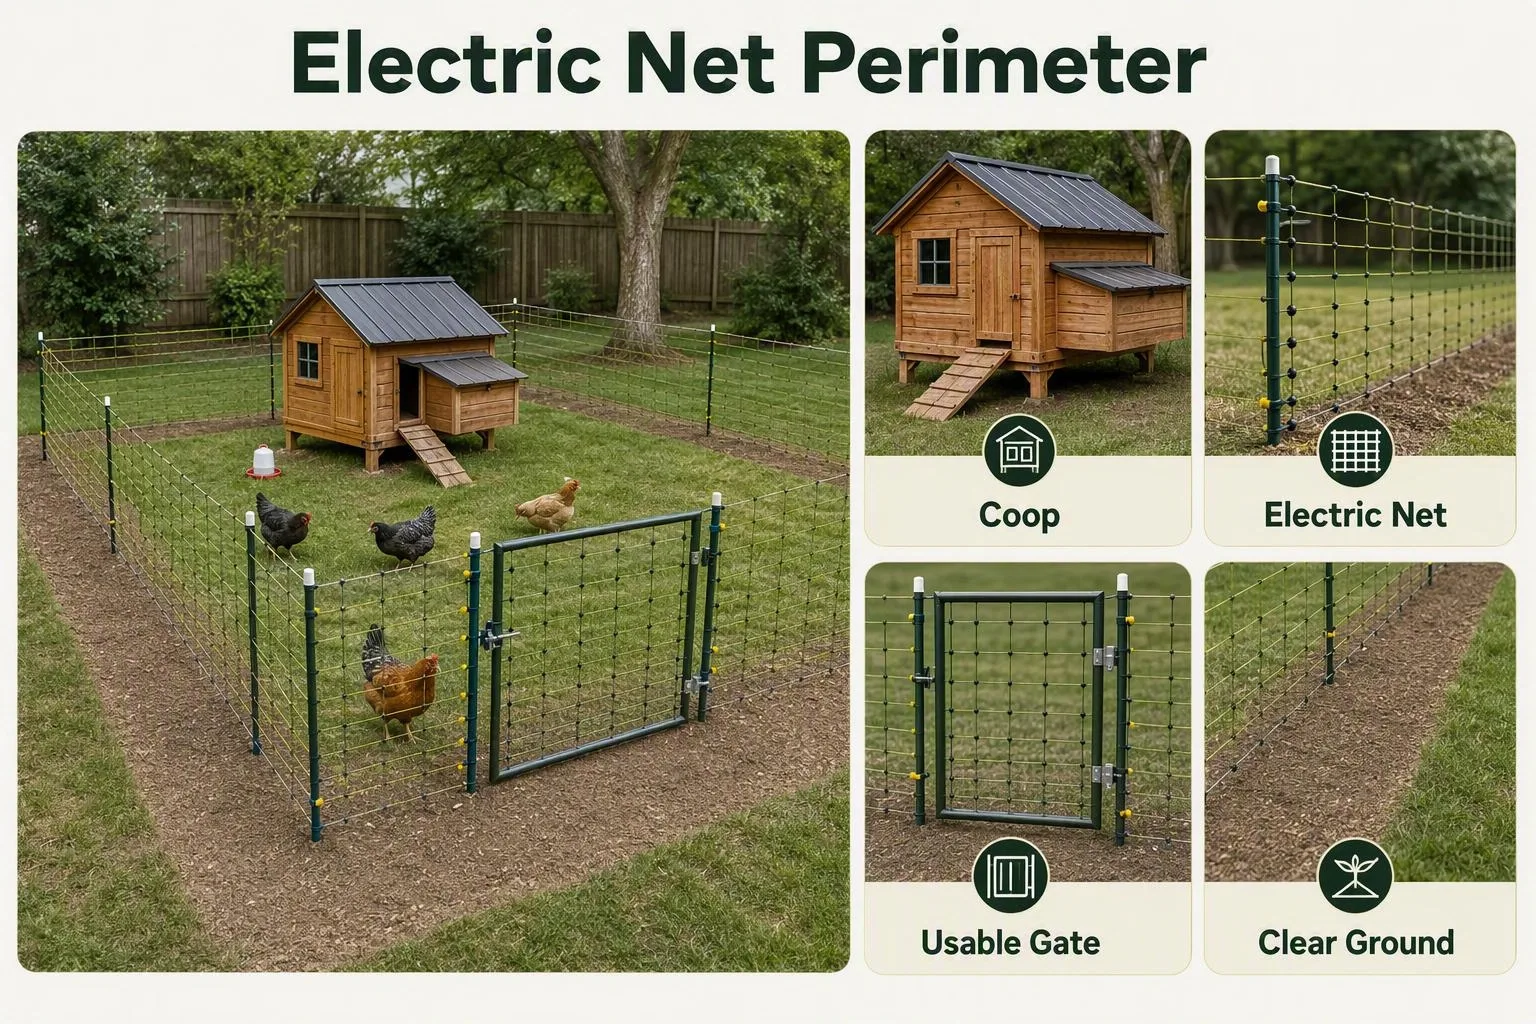
Electric poultry netting is a perimeter deterrent. Think of it as a line that encourages a ground predator to turn away, not as a solid wall that prevents every kind of entry. It does not cover a hawk above the flock. It does not remove a climber that gets over the net. It does not solve a predator already inside the enclosure.
Lay out the net so your coop sits inside the protected area, with a gate you can close without leaving a loose corner. Compare the actual net height and mesh spacing rather than relying on a product name. A short garden fence and poultry netting may look similar in a photograph but serve different jobs.
The energizer and grounding system need to match the fence length and the manufacturer's instructions. Keep grass, weeds, and branches from leaning into the live line. Vegetation drains the charge and can make a section less useful. Check the line after mowing, storms, and fast summer growth. Snow can bury or push down the mesh. Frozen ground can make grounding more difficult, so winter performance deserves its own check rather than an assumption based on autumn.
Do not improvise a mains connection or treat the energizer as a craft project. Use equipment made for this purpose, follow the installation instructions, and check local rules. Electrical safety authority guidance on electric-fence energizers, grounding, and placement is a better starting point than a forum shortcut.
A starter system may land around $150-$450 for netting and an energizer, depending on length, power, and included accessories. Treat that as a planning range. Check current local prices and add the cost of extra posts, a gate handle, grounding hardware, and replacement parts.
Pick 6 suits an open yard. It is less useful as a substitute for a secure run. Bring your birds inside before night and keep the coop barrier intact.
Pick 7 — a camera or motion light as an early-warning layer
Best for: a yard where you have clues but not enough information to choose the first physical repair.
A camera can show whether a visitor arrives at dusk, overnight, or during free-ranging. It can also show the route. A timestamp of a gate visit points you toward the latch and door. A daylight approach across the grass points you toward a roof, supervised ranging, or a perimeter. That information is valuable because it stops you from buying protection for the wrong side of the coop.
A motion light may interrupt some nocturnal visits. Treat it as a testable deterrent, not dependable protection. Keep the light outside the coop and aim it across the approach rather than directly into sleeping or nesting areas. Protect the camera or light from rain, mud, and curious birds. Place it high enough to see the route but low enough that you can clean, charge, or reset it.
A basic setup may cost about $20-$180. Battery, solar, wired, cellular, and cloud-connected models sit in different budget categories, and a cellular or cloud plan can add a recurring cost. Check current local prices and subscription terms before comparing two units by sticker price alone.
The useful judgment here is simple: buy Pick 7 when you are guessing. Do not buy it instead of repairing an opening you can already see.
Assemble the smallest package that fits your risk
You don't need every pick for every yard. You do need the picks that close your flock's actual routes. These packages are materials-only planning bands. They assume you are comparing current local prices and that labor, tools, delivery, subscriptions, and major site work are separate.
| Situation | Starting package | Trade-off | Existing sound frame | Building the run too |
|---|---|---|---|---|
| 3-4 hens in a suburban yard | Picks 1, 2, and 4; add Pick 3 for regular hawk activity | Small and inspectable, but a roof may reduce the open feel of the run | About $150-$500 | About $400-$1,000 |
| 6-12 hens beside woods | Picks 1-5 | Strong coverage for digging, climbing, aerial access, and dusk mistakes, with more material to maintain | About $400-$1,200 | About $800-$2,000 |
| Daytime ranging on open ground | Picks 1, 2, 3, and 6; add Pick 5 for dependable night closure | Good route coverage, but electric netting needs seasonal vegetation and grounding checks | About $450-$1,500 | About $900-$2,500 |
Those figures are deliberately broad. Run size changes the amount of mesh. A gate adds hardware. A roof needs support. A new frame can cost more than the barrier attached to it. Use the table as a shopping list boundary, then replace each band with current quotes from your local suppliers.
For the smallest suburban flock, I would spend first on a sound barrier rather than a camera. Pick 1 closes the walls. Pick 2 closes the soil edge. Pick 4 closes the human access point. Add Pick 3 if a hawk can reach the birds from above. That is a compact setup with a clear inspection routine.
For six to twelve birds beside woods, the larger perimeter changes the judgment. Use Picks 1 through 5 because a run with more corners and a busier gate needs more than one kind of closure. If you cannot inspect an automatic door daily in bad weather, skip Pick 5 and improve the manual closure instead. A simple secure door that you operate reliably is better than a sophisticated door that becomes an unchecked failure point.
For open-ground ranging, put the roof and perimeter ahead of decorative deterrents. Picks 1, 2, 3, and 6 cover the wall, soil, aerial, and approach routes. Pick 5 handles night closure. If you are deciding whether daytime ranging is worth the extra exposure, use Should you free-range chickens when hawks are nearby? as the next decision point.
Make a weekly inspection part of feeding day. Wear gloves and look closely at:
- the bottom edge of every wall and the full apron, especially corners and low spots;
- gate hinges, latch movement, and the gap beneath the gate;
- roof seams where panels meet the wall or the coop;
- loose washers, pulled staples, sharp cut ends, and posts that have shifted;
- the automatic door's manual override, battery access, track, and closing movement;
- electric-net clearance from grass, weeds, branches, mud, snow, and standing water.
After a hard wind or wet snow, do the walk before letting your birds range. A storm can move a gate, flatten netting, loosen a roof tie, or lift an apron edge without leaving an obvious break in the middle of the run.
This week, walk the run slowly and repair the first opening or weak fastener you find. Don't wait for a perfect shopping list. Predator protection improves when you close the active route, test the repair, and then move to the next weak point.